
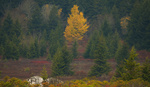
Golden hour is a great start, but learning to use light well goes far beyond the time of day. Here are three things about light I learned the hard way—and that I hope will help you make stronger landscape photographs.
When I started to become more serious about landscape photography, I heard over and over that the golden hour was the key to great images. Earlier or later in the day—those were the times really worth shooting. And it’s true: the light is softer, warmer, and often more convenient to work with. So I started to go out only during those times. But it took me a while to realize that golden hour alone isn’t enough. Just because the light is nice doesn’t mean the photo will be. Here are three things I wish someone had told me earlier.
It’s Not About the Light Being Pretty—It’s About What Effects It Has
It’s easy to get distracted by beautiful light. I used to walk into a location during golden hour and assume the job was half done—the colors were rich, the sky was glowing, everything looked beautiful at first glance. But when I checked the results later, they didn’t always translate the way I had hoped.
Eventually, I realized: good light isn’t about color or warmth on its own. It’s about how that light gives shape to the landscape. If you pay attention, you’ll start to notice how soft, angled light adds depth—casting shadows that separate layers of terrain, highlighting texture in a field or hillside, or wrapping around a tree in a way that gives it volume and depth. Once I started thinking in terms of form, not just glow, my images got stronger.
This is also why golden hour is great for black and white photography. Take away the color, and you’re left with tone and structure, shapes and forms. If you’ve used the light well, the image still works—maybe even better than it would in color.
Don’t Just Look at the Sun—Look at What It’s Lighting
For a while, photographing sunrises or sunsets mostly amounted to pointing my camera toward the sun, at the incredible colors in the sky. I formulated a quick composition around that and snapped away. And honestly, that worked sometimes. When the sky was dramatic, it felt like enough. But I was treating the sun—or the color around it—as the subject, rather than thinking about what that light was doing to the rest of the landscape.
Some of the best golden hour light happens away from the sun. Think of soft backlight hitting the tops of grasses, warm sidelight raking across a rocky slope, or reflected glow bouncing off clouds in the opposite direction. The sun is the source, but the real interest is often in how that light interacts with the land—not in the sun itself.
These days, I make a point of looking around. All the way around. If the sky is lighting up behind me, I want to know how that might work with or interact with the land. I check where the shadows are, where the light is landing, and how that helps or hurts the composition. It’s not about chasing color—it’s about understanding the direction and effect of the light. Choosing a subject and basing a composition around these effects results in much stronger images than relying on the sun or epic sunrise colors to carry a photo.
You Don’t Need Detail Everywhere
Modern cameras are incredibly good at capturing dynamic range. You can recover shadows, pull back highlights, and end up with a perfectly balanced exposure. But just because you can doesn’t mean you have to.
Some of my early edits looked oddly flat—not necessarily because the light was bad, but because I’d tried to show everything. I tried to mimic how well our eyes can handle that sort of dynamic range and how our brains interpret a scene with dramatic contrasts of light and dark. However, prioritizing either the light or the dark parts of a composition can lead to stronger or more artistic images.
I started letting some shadows go very dark. Or I allowed the sky to stay bright, even if that meant clipping a few highlights. I began using contrast with purpose, as a way to communicate my artistic intention. Instead of something to fix in post, it became a core aspect of many of my photos.
A camera doesn’t see the way we see. But if you understand that—and work with it instead of against it—you can make images that feel more compelling, more intentional, and more your own.
Bonus Tip: Light at Any Time of Day Can Work
It’s easy to chase golden hour and ignore everything else, but some of my favorite photos have come from shooting throughout the day—once I stopped fighting it. Instead of forcing a soft, evenly lit look, I started asking what that harsher light could do for me. Strong shadows, high contrast, or directional light on a single element can all become tools, if you lean into them. Not every photo needs to look like it was made at sunrise or sunset! So I came full circle and stopped photographing exclusively at those times.
Final Thoughts
Light is obviously the key to strong photography, and landscape photos are no different. Learning how to use it effectively starts by learning how to see it. Learning how to see light begins with recognizing that it’s about more than simply showing up at the right time. It’s about asking what the light is doing. Is it very direct, active light? Is it softer and more subdued? How is it interacting with the land? How is it creating depth or contrast? Consider how all of these answers support the story you're trying to tell. Golden hour is a great place to begin. But it’s just that: a place to begin.
What’s something you’ve learned about light that changed the way you shoot? How has your understanding of light and its effects evolved?


Great article, Adam. Your words and photos are very educational, for novice and advanced photographers alike. I can only offer a summary of the subject of light as I understand it, that maybe supports your points:
Light has three properties that I consider when making a photograph: direction, intensity, and color.
Direction: For landscape photography, light is generally considered to be best when directed at an angle toward the subject, creating side lighting which produces depth from shadows. Obviously we can't move mountains or move the position of the sun, but we can change the position of the camera which changes the perceptual relationship between the two. There are no absolute rules one must follow. Light from directly behind, or in back of the subject, has its unique advantages or limitations, depending on what you’re trying to accomplish. Not every photo has to follow a perfect script. Golden hour places the light source lower in the sky for creating longer shadows, but I also like shooting mid-day in the winter since the sun is relatively lower in the sky anyway than in summer.
Intensity: Portrait photographers use soft boxes and other types of light modifiers for controlling light intensity and creating gradual rather than harsh transitions of tone, i.e., diffusing and softening the light. Landscape photographers can use clouds much the same way, although far more at the mercy of mother nature to place them in the right spot. Wispy sort of clouds partially concealing the sun from your subject creates soft diffused light. More dense clouds and heavy overcast days block much of the sunlight’s intensity and create totally flat light, devoid of dark shadows and bright highlights. The next time you have some rapid changes of weather, pick a subject and watch how clouds moving through the area change the light on the subject, and its effect on the shadows and highlights.
Color: Light has a color temperature from warm to cool, and natural light can be altered through the camera’s white balance settings. It's worth taking time to observe the natural color cast upon your landscape subject, and consider how moving the camera’s white balance from cool to warm might improve the picture. Some of which might just correct to a natural color; other color temperature changes can be made for artistic impact. Thick clouds can also lower color saturation for a more pastel-like appearance.
Each of my four examples represent different light qualities:
At Bryce Canyon, no clouds and harsh light produced dark shadows and bright highlights. Preserving detail in both extremes is hard to manage, which is why most photographers avoid harsh light.
Heavy cloud cover in Arches National Park created less overall contrast and softer, pastel-like colors. Because of thick cloud cover that day, the visible natural colors were more muted than in this picture, but more manageable for editing to the photographer's satisfaction, within the category of creative license. Arguing over whether color looks real or not, often provides the inspiration for converting to black and white...
Thick heavy cloud cover near Castle Valley, Utah, produced flat light, reducing color to the point of black and white. This image was converted to black and white, although the difference between it and the color version is not much.
Lastly, golden hour and some clouds at Arches National Park created partially diffused soft light, as transitions from dark to light are more gradual, without a sharp line delineating one from the other.
The point is not to proclaim which is better, but to be aware when out in the field of how light is shaping the impact of your photograph. The important thing to remember is that without light, there is no photograph, so it's an important thing to study and gain experience with in all aspects.
Ed,
Your comment actually says more about how to use ambient light than the article itself does. Ha! Great job!
Haha well adding so many specific examples would've really lengthened this already long piece Tom Reichner! I was also shying away from providing a more "how to" guide, wanting to keep this at a slightly higher level. I would hope folks would want to dig in deeper after this -- sometimes too much information at once isn't helpful 🙂Especially when newer to photography.
I definitely appreciate the contributions in the comments, though. And I'd be interested to hear if readers would generally prefer that articles addressing concepts, like this one, also included some more detailed "how to" tips; or if those are better addressed in follow-up articles.
Ed Kunzelman Great discussion! I like to think about whether or not the light is active. Active light is going to create stronger contrast, deeper shadows, etc. Less active light will result in more even lighting across the scene. Both can happen at any time of day, and so I agree directionality matters. For example, I have encountered some extremely active light during golden hours that has resulted in extreme challenges to maintain shadow and highlight detail...not too dissimilar to the challenges of holding all that detail during midday. I've also photographed in extreme overcast or foggier conditions during the day that dropped the scene's contrast.
At the end of the day, it really is about matching the light to the subject and to what you're trying to express. Fighting the light doesn't usually result in a good image, regardless of the time of day or anything else! And that's really the thinking I hope this piece can start prompting, especially for folks earlier in their photographic journeys. I know it would've helped me to hear much earlier on.
What you call active light, I call hard or harsh light. What you call less active light, I call soft light. I suspect hard and soft are more widely recognized labels. As far as a novice photographer's learning process goes, my feeling, similar to yours, is that too much information can be detrimental. My way of simplifying the subject would be to just include the first two of my color pictures (Bryce and Arches) with a short text describing how the quality of light changed between hard and soft. The link between picture and text is critical, more than a general discussion of theory, in my opinion. People are not always suited to reading much. Not that it counts as scientific evidence, but I suspect the large majority of Fstoppers up-votes are for the shortest comments. I write essays and get little response... except from people like Tom Reichner, who reads everything, but he's already claimed to be abnormal. :-)
Either way, light is the key ingredient to mix with your subject, so it's worth far more discussion. Entire books are written on the subject of light, especially in the genre of portrait photography, although there's much for landscape photographers to learn from portrait photographers. When we learn to see light like a portrait photographer, we'll be watching the interplay between sun and clouds, and light direction, every minute.
Great point about reading (or lack thereof), Ed. And about leveraging specific photographic examples. I'll keep that in mind 🙂
I think you're right that "hard" and "soft" are more widely recognized terms. I had certainly heard them early on. For me "active" and "inactive" resonate more strongly. I'm not sure that I can put why that is into words, but now I'm compelled to think about it and see if I'm able to!
Great article and followup comments from Ed. Much of my travel photography is with family or friends and the golden hour(s) don't always fit our plans to my great chagrin. But I too have learned by necessity not to be dogmatic about it. Try working in a narrow canyon at the golden hour! If not working with early or late light and using sun angle, I favor intensity as the next most important property and hugely favor diffuse (not flat) light scattered by clouds, trees or anything else. Harsh specular highlights or direct overhead flat light are the only situations where I put the camera away. Thanks for helping release us from the tyranny of the golden hour.
Travelling with others can definitely be the "great equalizer" in terms of what light we use! And I agree, intensity (or activeness) of the light can lead to compelling compositions at most times. Let's keep freeing ourselves from feeling forced to shoot at certain times of day or under certain conditions 👍
Thanks for the comment Thomas Upton!